Wednesday, 21 December 2016

Carrot, Cashew & Apricot Stuffing Balls


Carrot, Cashew & Apricot Stuffing Balls
Never wishing to feel like I'm missing out, I have to admit to being a little miffed if Christmas Day comes around and I find that I have to forgo all of the trimmings. But stuffing is so versatile. It can easily be adapted to suit everyone.

These Carrot, Cashew & Apricot Stuffing Balls are crispy on the outside and soft in the middle. Lightly spiced, with little nuggets of sweetness from the dried apricots, they work as well with turkey or goose as they do with a vegetarian main course. In fact, I'd quite happily forgo the main event for a pile of these little morsels, roasties, buttered kale, honey and lime roasted parsnips and a huge jug of vegetarian gravy.

Carrot, Cashew & Apricot Stuffing Balls

They taste just as good cold the day after, so make sure there are plenty to snack on when Boxing Day comes around. And if you do have happen to have some leftover (or if you make a double batch) they make great snacks for children (and adults).

Carrot, Cashew & Apricot Stuffing Balls
To make this recipe vegan, replace the butter with olive oil and use your usual egg replacer instead of the eggs.

Ingredients

50g cashew nuts
25g unsalted butter
1 small onion, finely chopped
1 medium carrot, peeled and coarsely grated
1 tsp ground cumin
zest of 1/2 unwaxed orange
100g fresh breadcrumbs
50g dried apricots (about 8), chopped
1-2 tbsp chopped flat leaf parsley
2 medium eggs, beaten
salt & black pepper (optional)

Method

Preheat the oven to 190C (170C fan).

Put the cashew nuts on a small baking tray and roast in the oven for 8-9 minutes, until they are a light golden colour. This really enhances their flavour, so well worth doing. Remove from the oven, leave to cool and then roughly chop. If you are feeding babies or very young children, you can pulse the cashew nuts in a food processor until they resemble breadcrumbs instead of chopping them so there's no risk of choking.

Whilst the cashew nuts are in the oven, put a small frying pan over a medium heat. Add the butter. Once the butter has melted add the onion and turn the heat down a little. Cook for 7-8 minutes, stirring often, until the onion has softened and is beginning to turn golden at the edges. Add the grated carrot and continue to cook, stirring often, for a further 5 minutes, until the carrot has softened. Add the ground cumin and cook for a minute or two.

Transfer the onion and carrot mixture to a large mixing bowl and leave to cool.

Once cool, add the orange zest, breadcrumbs, chopped dried apricots, chopped flat leaf parsley, roasted cashew nuts and season (I don't add salt as I cook for young children and there is already salt in the breadcrumbs, but if you are cooking for adults you will probably want to add salt and pepper to suit your tastes). Stir well to combine.

Line a baking tray with non stick baking paper.

Add the beaten egg to the mixing bowl, a little at a time, and mix well (I use sourdough breadcrumbs which seem to need a little more egg to combine, but you may not need the full amount, so add gradually). Form the mixture into 9 balls, each about the size of a golf ball, and place them on the lined baking tray.

Put the baking tray in the oven and bake for 20 minutes, until the stuffing balls are golden and a little crispy at the edges.

Serve hot or cold. The stuffing balls can be made ahead, cooled and frozen. Defrost thoroughly and then reheat in a medium oven for 7-8 minutes, until hot.

Carrot, Cashew & Apricot Stuffing Balls

Friday, 16 December 2016

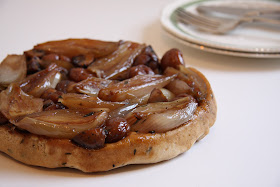
Caramelised Shallot & Chestnut Tarte Tatin with Spelt Olive Oil Pastry


Caramelised Shallot & Chestnut Tarte Tatin

Old recipes need to be revisited. Viewed afresh. Updated. There are new ideas and techniques. Ways to improve. Ingredients which have become more readily available. Others which are outdated or have fallen out of favour.

So this is my updated Caramelised Shallot & Chestnut Tarte Tatin. The perfect vegetarian and vegan centrepiece for Christmas dinner. I first wrote a version of this recipe back in 2009, having made it for Christmas dinner a few years earlier.  My Uncle John was visiting from Ireland for Christmas, an event in itself, which always involves much silliness, standing on chairs singing nursery rhymes and a vegan alternative to turkey for us all to share.


The original recipe (such as it was, made, eaten and enjoyed, but never written down) was vegan, but the pastry will no doubt have been made using White Flora, a white vegetable fat, which has long since vanished from shop shelves. Its closest dairy-free equivalent, Trex, is made from palm oil. Whilst it may make good pastry, I won't buy it. The same goes for the principal dairy-free ready made puff pastry on the market, Jus-Rol, or indeed anything containing palm oil. Its connection with rainforest deforestation, human rights violations, child labour and animal cruelty (to name but a few) is well documented. I'm with Joanna Blythman, journalist and author of Swallow This, when she says that going into 2017 it is time to abandon palm oil.

So this tarte tatin has a classy new pastry to be proud of. Rich and packed with fresh thyme, it is simple to make and work with. There's no need to be careful and light of finger when mixing the ingredients, and definitely no rubbing fat into flour until it resembles breadcrumbs. When dry ingredients meet wet ingredients, the pastry comes together in a matter of seconds. A vegan-friendly pastry recipe which uses olive oil instead of palm oil.

The combination of shallots, chestnuts and mushrooms is not a new one. Especially at this time of year, when they are all in season and at their best. Add a splash of madeira and plenty of fresh thyme and they taste so good.


Ingredients

For the pastry:

225g white spelt flour
1/2 tsp baking powder
1/2 tsp salt
1/2 tsp nutritional yeast (optional)
1 tsp fresh thyme leaves
75ml extra virgin olive oil

For the rest:

2 tbsp olive oil
500g shallots (about 400g peeled weight)
150g cooked, peeled chestnuts
100g chestnut mushrooms
1 tsp fresh thyme leaves
1 tsp muscovado sugar
1 tbsp madeira*
salt and freshly ground black pepper

Method

Begin by making the pastry (this can be done up to 24 hours ahead). Put the flour, baking powder, salt, fresh thyme leaves and nutritional yeast (if using) into a large mixing bowl and whisk together with a balloon whisk. Add the olive oil and 70ml cold water. Using your hands, bring the ingredients together to form a rough ball. Knead lightly for a few seconds until the pastry is smooth.

Flatten the pastry out into a patty, wrap in cling film and chill in the fridge for at least 30 minutes (longer if possible).

Whilst the pastry is chilling, prepare the rest of the ingredients.

Peel the shallots and slice any large ones in half lengthways. Clean the mushrooms by wiping them with a piece of kitchen roll, then trim off the stalks and cut into quarters.

Preheat the oven to 200C (180C fan).

Put a tarte tatin dish dish (20cm diameter) or an oven-safe frying pan of the same size over a medium heat. Add the olive oil, then place the shallots into the dish, cut side down (for those you have sliced in half). Cook for 10 minutes until the shallots are starting brown slightly. Add the chestnuts, mushrooms, thyme leaves and sugar, pushing the chestnuts and mushrooms down gently between the shallots. Cook for another 5 minutes, then add the madeira, season with salt and freshly ground black pepper and cook for 2 to 3 minutes.

Remove the pastry from the cling film and place it on a lightly floured surface. Roll out, turning with each roll, until it is a rough circle measuring about 22cm in diameter. Using a pastry brush, brush a little oil around the inner rim of the tarte tat in dish, then careful lift the pastry over the shallot mixture, tucking it in, and any surplus pastry back on itself, to form a seal.

Bake for 30 minutes, until the pastry is a light golden colour.

Slide a knife around the edge of the pastry to loosen. Put a plate over the dish and then carefully tip the dish with the plate held firmly on top over so that the tarte tatin is sat shallot side up on the plate. Remove the dish. If any shallots decide to stick to the dish instead of the pastry, carefully lift them off the dish with a fish slice or spatula and put them back into position on the pastry.

I like to serve this with roast potatoes, buttered kale or cabbage and vegan gravy.

*not all brands of madeira are vegan-friendly, so if you are making this for someone who is vegan it is worth checking.


Monday, 12 December 2016

Festive Rocky Road

Festive Rocky Road

Calories are essential.

You're on the home straight. The final push. You need to keep your energy (and spirits) up.

Whether you're partying hard, wrapping a mountain of presents, ferrying children from party to performance or staying up half the night, bleary-eyed, with gin in hand, trying to create a nativity costume (with the stars falling off as quickly as you can stick them on), you need sustenance. This is no time for self sacrifice.

These little morsels of rocky road are easy to eat. Too easy perhaps. Blink and you've demolished four. So make them, give half away as festive gifts (another job ticked off that mother of all lists) and let yourself loose on the rest.

And if you are worried about that calorie thing, then take the advice of Mum's work colleague: break a piece in half, shake out the calories and get eating.

Maraschino, Amaretto & Almond Rocky Road

Makes 64 bite-sized pieces

Ingredients

200g Green & Blacks 70% dark chocolate
100g Green & Blacks milk chocolate
100g good unsalted butter
3 tbsp condensed milk
pinch maldon salt
2 tbsp amaretto liqueur (optional)
zest 1 orange, finely grated
100g Luxardo maraschino cherries (drained weight)
50g blanched almonds, toasted and roughly chopped
150g amaretti biscuits

Method

Grease and line a 20cm square, loose-bottomed baking tin.

Break up the chocolate and put it into a large heat proof bowl with the butter. Place the bowl over a pan of simmering water (taking care to make sure that the bowl doesn't touch the water) and, stirring occasionally, leave the chocolate and butter to melt.

Whilst the chocolate is melting, blot the maraschino cherries on kitchen paper to remove most of the syrup and cut each one in half. Put the amaretti biscuits into a plastic sandwich bag and bash them a little with a rolling pin until they are roughly broken up.

Once the chocolate has melted, add the condensed milk, salt, amaretto liqueur (if using) and orange zest. Stir to combine.

Add the maraschino cherries, toasted almonds and amaretti biscuits. Stir until evenly coated in the chocolate. Transfer the mixture to the prepared tin, spread out to fill the tin and smooth the top with the back of a spoon as best you can.

Put the tin into the fridge for an hour, or until solid. Alternatively leave overnight. Then remove from the tin, discard the baking paper and carefully cut into small pieces. Dust with icing sugar.

Store in the fridge or a cool place.


Tuesday, 6 December 2016

Apricot, Almond & Amaretto Mincemeat


One of my earliest memories of food at Christmas time is of my mum appearing by my bedside late one evening, a large mixing bowl rested in the crook of her arm. It was dark, with just a flicker of orange light creeping in through our old brown curtains from the street light outside. I felt snug under my crisp sheets and eiderdown, and comforted by the familiar sounds around me. Yet I was drowsy and bewildered.

Looking back now, the wooden spoon being proffered can only have been for me to stir our Christmas pudding. In that hazy light, as if watching myself on sepia-tinted film, my faded memory sees me push myself up, resting on one elbow as I dutifully stir the heady mixture of dried fruit, cinnamon, nutmeg, orange and brandy. With my sleep-heavy limbs, I managed one, maybe two, turns of the bowl before I settled back down, contented.

Apricot, Almond & Amaretto Mincemeat

It has been a long time since I have been around to give my mum's Christmas pudding its traditional stir for good luck. Instead it is my turn to pass these traditions on to my sons. The huge, old Mason Cash mixing bowl, with its crazed glaze. A tarnished old tablespoon which was tucked into my kitchen box when I left home for university. And one of many well-used wooden spoons, which have stirred food, banged pots as if they were drums and will one day themselves be packed into a bag leaving home for the future that lies ahead.

As I grew older, my memories of festive baking with my mum, in the kitchen of our little two up two down, turned to mince pies. Not just the odd dozen here or there. Tray after tray of brandy-laced mincemeat wrapped up in flaky shortcrust, always lovingly made by hand. The mince pie tin has to be seen to be believed. One minute filled to the brim with two, maybe three dozen rich, buttery pies, only for hands grappling to be the first to reach the last one moments later.

Homemade Apricot, Almond & Amaretto Mincemeat

The very best mince pies are those crammed so full with boozy, homemade mincemeat, that it seeps out like molten lava as they bake. My mincemeat recipe evolves year on year. This is the third iteration of 2015. The jars to be polished off this week before we embark on a new batch for 2016.

Ingredients

100g golden raisins
200g currants
100g large black flame raisins
200g sultanas
75g good unsalted butter
200g soft brown sugar
zest & juice 2 oranges
zest & juice 1 1/2 lemons
200g bramley apples (cored & peeled weight), grated
75g blanched almonds, toasted and roughly chopped
150g dried apricots, finely chopped
1 1/2 tsp ground mixed spice
1/2 tsp ground ginger
freshly grated nutmeg (as much or as little as you like)
100ml amaretto
25ml cognac

Method

Mix the raisins, currants and sultanas in a large mixing bowl and pick over to remove any stems.

Put a large pan over a low heat. Add the butter, sugar, orange and lemon zest and juice and stir until the sugar has dissolved.

Add the grated apple, raisins, currants, sultanas, dried apricots, almonds and spices. Stir to combine.

Put the mixture back into the large mixing bowl and stir in the amaretto and cognac. Cover with a tea towel and leave in a cool, dark place for at least 24 hours.

If you are just making the mincemeat to use over a couple of weeks then it will keep perfectly well sealed in a plastic container.  If you want to store it in jars to keep it for longer, then fill sterilised jars, seal and store in a cool dark place.

Homemade Christmas Gifts

*Please don't be put off by the list of random dried fruit. I like to use lots of different sultanas, raisins, etc for their size, flavour and colour, but you could just use the equivalent weight of whatever you have knocking around in the cupboard. Just make sure you use the dried apricots for this recipe because it really does make a difference.

Thursday, 15 September 2016

Bakewell Pudding Ice Cream


Bakewell Pudding Ice Cream
I am well aware that September is not usually the time of year to be publishing an ice cream recipe. Until the beginning of this week, my mind had begun to turn to corn on the cob, squash and hearty bowls of soup. I was all set to add fish pie to next week's meal plan. Then here in London, summer decided it would have one last hurrah before ceding passage to the crisp, fresh days of autumn.

As the table laden with gutsy, monochromatic bakes at Band of Bakers last night will testify, the regional bakes of our British Isles are not made for these Indian Summer days. A heavy and (dare I say it)  rather stodgy collection of tarts, buns and cakes with more than their fair share of dried fruit, pastry and lard.

Hailing from Derbyshire, I had my eye on a Buxton Pudding, a baked dessert made with egg yolks, sugar, flour, milk and lemon zest (which I've never eaten, let alone baked before) or some Ashbourne Gingerbread. Then on Sunday evening the ever-reliable Countryfile weather forecast painted a rather different picture of my week, with temperatures set to rocket back up in to 28C. I adore hot weather. Love it. But I'll be damned if I am going to entertain the thought of spending hours in a hot, sticky kitchen baking on a scorcher of a day.

Everyone knows that ice cream is what we need on a hot day and this recipe is embarrassingly easy. Really. Damn it, you could even use shop bought madeira cake and a jar of good raspberry jam if you didn't have the time (or the heat tolerance) for baking and jamming.

Just remember to take it out of the freezer 5 minutes before serving to come to (rather than taking it out 45 minutes before and then spending that time rushing to Band of Bakers with the ice cream in a cool bag, including a diversion due to jumping on the wrong bus, panicking that all the while your ice cream will turn up looking more like Bakewell Pudding Soup).

Bakewell Pudding Ice Cream

Ingredients

For the frangipane:

75g unsalted butter
75g golden caster sugar
1 medium egg
1 tbsp amaretto
finely grated zest of 1/2 lemon
50g plain flour
1/2 tsp baking powder
75g ground almonds

For the raspberry jam:

250g raspberries
250g caster sugar
juice 1/2 small lemon

For the ice cream:

1200ml double cream
397g tin sweetened condensed milk
1/2 tsp good almond extract (I used Steenbergs Natural Almond Extract)

Method

Begin the day before you want to eat the ice cream by making the frangipane and the raspberry jam (alternatively you can use a jar of good quality raspberry jam).

For the frangipane:

Preheat the oven to 190C (170C fan). 

Grease a small loose bottomed square or rectangular cake tin (a 15cm tin would work well here) with a little unsalted butter.

Using a stand mixer or electric beaters, beat the butter and caster sugar until pale and fluffy (this can easily take 5 minutes or longer, depending on your mixer).

Beat the eggs together with the lemon zest and amaretto, then add this to the butter and sugar mixture a little at a time and continue mixing until incorporated. Don't worry if the batter looks a little like it has curdled, it will come together when you add the flour.

Sift the flour and baking powder and add to the batter along with the ground almonds. Mix until just combined.

Put the batter into the prepared tin and smooth the top.

Bake for 18-22 minutes or until light brown on top and a skewer comes out with only a few moist crumbs. Leave to cool in the tin for 30 minutes and then remove from the tin and leave on a cooling rack until completely cool. Store in an airtight cake tin.

For the raspberry jam:

Preheat the oven to 150C.

Spread the sugar out on a large baking tray or roasting tin. Put the tray into the oven for 10 minutes to allow the sugar to heat up.

In the meantime, put the raspberries into a jam pan or heavy based pan (I use an old Le Creuset casserole) over a low heat. Once the sugar is heated up (this helps it to dissolve quicker) add it to the raspberries along with the lemon juice and stir.

Bring to the boil and boil rapidly for around 10 minutes. When the jam reaches about 106C remove from the heat and carefully pour through a metal sieve into a clean bowl, to remove the seeds. Set aside to cool.

For the ice cream:

Put the cream into a large bowl. Whip the cream with electric beaters until it forms soft peaks. Add the almond extract and the condensed milk and continue to whip for about a minute until the mixture is quite stiff.

Scrape the ice cream mixture into a large shallow pyrex dish or tin (I used two rectangular pyrex dishes which have plastic lids). Dot the cooled, sieved jam across the top of the ice cream and swirl gently using the end of a spoon or a knife.

Slice the frangipane into small pieces (approximately 1cm cubes) and gently press them into the top of the ice cream mixture, taking care to space them evenly. You may not need all of the cake.

Cover well and put into the freezer for at least 6 hours or, preferably, overnight. Remove from the freezer 5 minutes before serving.

Friday, 5 August 2016

Savoury Cake with Spiced Onions & Chickpeas

Savoury Cake with Spiced Onions & Chickpeas

Have I told you about Band of Bakers? If not, it's probably about time I did. It's my fourth baby (my first was a cat and the middle two are human). Founded by Gemma and I in 2012 out of a mutual love of cooking, baking, eating, talking and, well to be perfectly honest, drinking.

Band of Bakers is a bake club. A bit like a book club, but with a lot less reading and a lot more baking. And some sleepless nights. Sugar fuelled and stuffed to the gunnels it is virtually impossible to nod off until the early hours after an event. 

The itinerant Band of Bakers roves around our gorgeous little corner of SE London, hosted by generous local business owners The PalmerstonThe Crooked Well and Brickhouse Bakery every couple of months. Each event is themed so you rarely taste the same bake twice. Except at our retro event when there were no less than THREE black forest gateaux. But, you know, cherries and kirsch.

For the last innovation-themed event before our summer break I baked this savoury cake. It's kind of a riff on a cornbread, but with warm spices and gorgeously fragrant curry leaves. I had a bag of yellow pea flour lurking in my cupboard, which is produced by Hodmedods, a Suffolk-based independent business sourcing and supplying British-grown pulses, grains and flours. A naturally gluten free flour, milled in Essex from British-grown split peas, it is high in protein and a great alternative to gram flour. The idea was for bakers to create a bake using ingredients or techniques they had never used before. So this was my contribution - a simple, delicious savoury cake. Great served with dal and raita or as a pre-dinner nibble with drinks. Leftovers make for a good picnic or lunchbox filler.

Savoury Cake with Spiced Onions & Chickpeas (gluten free)

Ingredients

For the cake:

150g course gluten free polenta 
75g fine ground yellow pea flour
1 tsp baking powder
1/2 tsp bicarbonate of soda
1/2 tsp salt
1/4 tsp ground turmeric
1/4 tsp garam masala 
250g whole milk yogurt
2 medium eggs
50g butter

For the topping:

2 tbsp groundnut oil
2 tsp black mustard seeds
large pinch gluten free asafoetida 
2 large onions, sliced 
10-12 fresh curry leaves
1/2 tsp ground turmeric
1 tsp Kashmiri chilli powder
1/2 tsp salt
freshly ground black pepper
2 tsp soft brown sugar
1-2 tsp tamarind paste
1/2 400g tin chickpeas, drained and rinsed

Method

In a large bowl, mix together the polenta, yellow pea flour, baking powder, bicarbonate of soda, salt, turmeric and garam masala. In a separate bowl, beat the yogurt and eggs together then stir into the dry ingredients and mix to form a smooth batter. Put to one side whilst you make the topping.

Pre-heat the oven to 220C.

Put a heavy based frying pan over a medium heat. Add the oil. When the oil is hot, add the black mustard seeds and asafoetida. Wait for the mustard seeds to begin to pop (about a minute) then add the onions and fry for around 10 minutes, until they have softened and golden. Add the fresh curry leaves, ground turmeric, chilli powder, salt, black pepper and brown sugar and stir to coat the onions. Finally, add the tamarind paste and chickpeas and stir to combine.

Put the butter in a 20cm x 30cm rectangular roasting tin and put it into the oven until the butter has melted and the tin is piping hot. Pour the batter into the tin and quickly put the onion and chickpea mixture over the top (I find that the easiest way to do this is with your fingers). 

Put the roasting tin back into the oven and cook for about 10 mins, until golden brown.

Serve hot or cold.


Thursday, 7 July 2016

Banana Sourdough Pancakes

Banana Sourdough Pancakes

Feeding my boys is a full time job. Or at least it feels that way. No sooner have the early morning cries for porridge been met than fruit needs distributing and packed lunches assembling. There's bread to be baked for sandwiches, fritters to be fried, chickpeas to whizz up into houmous, vegetables destined for soup to be chopped. All before the morning school run.

And that's how weekdays go, in a bit of a blur of the day to day routine. I try (but in reality fail) to fit everything in - always on my feet, mostly in the kitchen, with my two year old by my side. He loves nothing better than getting his hands on anything and everything. So we cook, chat, eat and play our way through our days together. Stopping for coffee mid-morning. Our daily ritual whether we're at home or out. Lunch at midday. And now, whilst the sun shines, he can spend his afternoons outside in the garden digging up the lawn, collecting snails, balancing precariously on the upturned butler's tray and festidiously ensuring that all of the stones from the garden path are distributed across the grass (it would be entirely misleading to call it a lawn), whilst I flit in and out. Playing, pegging out washing and feeling permanently guilty for not giving enough of my time to anything or anyone.

When the weekend arrives our shoulders visibly drop, we breathe more deeply, the pace slows, and getting dressed before breakfast is not an option. Cups of tea are drunk whilst still hot. And so, once the demand for porridge has been satisfied, there is the time and head space for something different. Packing a picnic and heading to the woods, cycling in the park, a trip to the theatre. Or simply kicking back at home, reading endless stories and eating pancakes.

These banana sourdough pancakes are our current favourites. My boys love them. I love them. Especially with a drizzle of Peckham Honey.

Banana Sourdough Pancakes with Peckham Honey

Inspired by my hatred of waste, I make these pancakes with the unfed sourdough starter which would usually otherwise be discarded after feeding the mother (I keep mine in the fridge as I generally only bake sourdough once a week). This recipe is adapted from Vanessa Kimbell's recipe for Sourdough Scotch Pancakes which is on the Bakery Bits website.

Ingredients

125g sourdough starter
1 medium egg, beaten
90ml whole  milk
1 tsp vanilla bean paste (optional)
1 medium banana, mashed
100g pasta / 00 flour (I used Dove's Farm pasta flour)
1 tsp baking powder
groundnut oil for frying

Method

In a large mixing bowl, whisk together the sourdough starter, egg, whole milk, vanilla bean paste (if using) and mashed banana.

Sift the flour and baking powder into the batter and stir to combine.

Put a pancake pan or heavy based frying pan over a medium heat. Add 1 tbsp groundnut oil to the pan and swirl around to coat the bottom of the pan. Pour any excess oil into a small bowl and put to one side. Pour a heaped tablespoons of batter into the frying pan, leaving a little room between each one (I usually fit 4 at a time in my medium sized pan). Allow to cook for a minute or two until the pancakes are a light golden brown colour, taking care not to overcook them. Using a fish slice, turn the pancakes over and cook in the same way on the other side.

Using the excess oil which you put to one side, continue to cook the pancakes using up the rest of the batter.

Keep the cooked pancakes warm in the oven (170C/150C fan) until you have finished cooking them all. I like to serve them with fresh fruit and a little honey, but you could add bacon and maple syrup or greek yogurt and fruit compote, or just eat them as they are.

Friday, 20 May 2016

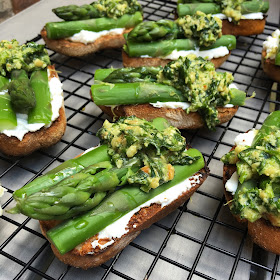
British Asparagus Crostini with Parsley Pesto


Pesto - pounded sauce by any other name - is my current obsession.

It all started with a long, lazy Easter weekend with family on the outskirts of Paris. Four days of cooking, eating, drinking good wine and putting the world to rights. The all important drinking nibbles created by the lovely Lisa (cookery teacher and food writer at bien cuit gluten free) included a radish top pesto. A resourceful vibrant green dip for our crisp, pink French breakfast radishes.

The pesto love-in continued when I returned home to find that my friend Jassy had posted her recipe for Wild Garlic & Pistachio Pesto. Bereft of wild garlic but with an abundance of parsley I set about pounding roasted garlic and some nibbed pistachios which really were well past their best. I skipped the parmesan because we were eating this particular pesto with a creamy little burrata. But thinking about it, I rarely put cheese in my pesto these days - I prefer the clean taste of the nuts and herbs - making it naturally vegan.

This recipe came about, as many do, from opening the fridge door and creating something new. It's so easy to get stuck in a rut cooking the same meals week in week out, especially when there are little (demanding) mouths to feed. But I get bored. There is no pleasure in food that is solely for fuel, which is the way some meals can begin to feel when you're feeding a family. My boys would eat the same handful of meals in rotation given half a chance, with pasta and my 'pasta sauce' topping the list by a long way. That may make for an easy life now, but I wouldn't be doing my job (and what I truly believe is an important one) of exposing them to a myriad of flavours, textures, smells and sensations to set them up for a lifetime of enjoying food. So I cook for me, for them and for their future selves.


I'm particularly fond of almonds with asparagus, but toasted pine nuts or cashews would work pretty well too. I'm all for using up what's in the cupboard rather than spending money on yet more ingredients to languish in their packets, unloved and forgotten.

Ingredients

1 ready to bake half ciabatta
2 tbsp olive oil
125g ricotta
10 fat spears asparagus, washed and woody ends removed

For the pesto:

25g blanched almonds, toasted and roughly chopped
1 roasted clove of garlic
large pinch of maldon sea salt
40g flat leaf parsley, washed
juice of half a lemon
freshly ground black pepper
2 tbsp extra virgin olive oil

Method

Slice the ciabatta into 10 slices, discarding the crusts at each end. Place on a baking sheet and brush both sides of each slice with a little olive oil. Toast under a hot grill on both sides until golden brown. Transfer the toasted bread to a wire rack to cool.

Bring a large pan of salted water to the boil. Cook the asparagus in the salted water for 3-4 minutes until just cooked. Drain the asparagus and plunge into cold water to cool. Drain and then dry on kitchen paper. Slice each spear in half and then slice the thicker end in half lengthways, so that you have 3 pieces of asparagus, roughly the same length, from each spear. 

To make the pesto, using a mortar and pestle, pound the roasted garlic clove and salt to form a paste. Add the chopped toasted almonds and pound again until some of the almonds start to break down. Roughly chop the parsley (including the thinner stalks) and add this along with the lemon juice, black pepper and olive oil and continue to pound until you have a rough, chunky pesto. 

When you are ready to serve, spread a little ricotta on each crostini, top with the asparagus and a teaspoon of pesto. Drizzle with a little extra olive oil before serving.


Friday, 29 April 2016

Leek, Jersey Royal & Cheddar Galette with Sprouted Spelt & Hazelnut Pastry


The beginning of this year was fairly full on in our house. Exhausted, yet with much partying to be done, something had to give. There were a few more take aways, leftovers began taking up permanent residence in the fridge and the cupboards seemed to be filling up with food that I couldn't find the time to cook. The nap-avoiding Baby R had reverted to newborn sleeping patterns and I was bumbling from day to day on a few hours broken sleep (and gin, always gin). When we finally surfaced some time in late February the kitchen cupboards were fit to burst. Leftovers from catering for my birthday tea party, tins that had just kept arriving in the weekly shop, half packets of five different types of rice. 

Ridiculous really for someone who usually uses up every last scrap of leftovers. 

So I set about cooking and eating the cupboards. Family meals created to use up all of those odds and ends of pulses, grains, frozen scraps of fish, limp herbs and vegetables way past their best. It's quite a cathartic process - stripping everything back, being creative and avoiding waste (before starting all over again). A handful of the more photogenic meals made it onto my instagram feed under the hashtags #cookingthecupboards and #eatingthecupboards.

Returning from my (all too brief) trip to visit my sister in Vietnam and back in my kitchen this week I found some sad looking leeks which I'd ordered from Farmdrop before I left, a handful of leftover Jersey Royals and that packet of Rude Health sprouted spelt flour which has been slowly creeping to the top of the cooking the cupboards list (slowly, simply on account of the fact it hadn't yet been opened and therefore could wait patiently a little longer…).

Galettes are a great starting point if you're new to baking tarts or quiches. No careful precision or blind baking required. Simple and rustic (or rough and ready, whichever way you look at it). I usually bake sweet galettes, so this recipe is my first foray into the savoury sort. They are relatively quick to make and bake too, making them a good option for family meals, packed lunches or weekend picnics.


Jersey Royals really are the kings of the potato world. Their distinctive flavour works so well in this tart, but if you can't get them they can be substituted with other new potatoes. The best Jersey Royals to buy are the ones still covered in mud and soil which protects them in transit. Just wash gently to help keep their papery skins intact.

The sprouted spelt flour from Rude Health is delicious in this pastry and combined with the roasted hazelnuts gives the pastry an intense, rich nutty flavour. And it's also really good for you. It is more expensive than normal spelt (or other flour) though, but definitely worth trying. If you'd rather stick with what is already in your cupboards, rather than buy more ingredients, then you can replace the 160g with standard plain flour or spelt flour, but I'd opt for wholegrain (or a mixture) rather than all white.

Ingredients

For the pastry:

30g blanched hazelnuts
160g Rude Health sprouted spelt flour
80g unsalted butter
pinch of salt (optional)
50ml cold water

For the filling:

500g leeks, washed and trimmed
1 tbsp groudnut oil
4 or 5 Jersey Royal potatoes (or other new potatoes), cooked and sliced
1 large free range egg
3 tbsp double cream
1 tsp dijon mustard
freshly ground black pepper
75g mature cheddar, grated
salt to taste (optional)
1 tbsp parmesan or vegetarian equivalent, grated

1 free range egg, beaten (to glaze)
1 tbsp toasted hazelnuts, roughly chopped (to serve)

Method

Begin by making the pastry. 

Preheat the oven to 170C. 

Put the hazelnuts on a small baking tray and roast for 7-8 minutes until golden. Leave to cool completely then put them into a food processor or blender and pulse until finely ground. 

Put the flour, salt (if using) and butter in a mixing bowl and rub together with your finger tips until they resemble breadcrumbs.  Stir through the ground hazelnuts. Add the cold water, a little at a time, and bring together to form a ball, handling the pastry lightly and as little as possible.  Flatten into a patty, wrap in cling film and chill in the fridge for 30 minutes.

Preheat the oven to 200C. 

Slice the leeks into 5mm rounds and wash thoroughly in several changes of water. Heat a frying pan over a medium heat, add the oil and then the leeks. Cook for 5 minutes, stirring often, until the leeks are soft but still have a little bite. Put to one side to cool.

In a small bowl beat together one egg, double cream, mustard, black pepper and salt (if using). Stir in  the cooled leeks.

Line a large baking sheet with non-stick baking parchment or a silicone liner. Roll the pastry out until it is about 3mm thick and lay it on the baking sheet. If you're using the sprouted spelt flour you may find that it is a little tricky to roll out as it can be quite fragile. Any little cracks can be squished back together - so long as there are no big holes or cracks for the filling to leak through you're winning.

Scatter the grated cheddar onto the pastry, leaving a 4-5 cm gap all the way around the edge. Spread half of the leek mixture over the top of the cheese, followed by a layer of sliced potatoes and finish with the rest of the leek mixture. Top with the grated parmesan (or vegetarian equivalent).

Carefully fold the edges of the pastry over the filling, making little tucks where needed and plugging any little tears or holes as you go. Brush the pastry with the beaten egg.

Bake for 35 to 40 minutes, until the pastry is cooked. Transfer to a wire rack. Sprinkle with the chopped toasted hazelnuts and serve hot, cold or at room temperature.


Saturday, 9 April 2016

Wild Garlic Socca & Whipped Feta


Each year, as the vibrant green, pungent leaves start creeping onto menus and into recipes, I wonder why I didn't take my friend Danny up on his offer last year (and the year before, and the year before that…) of a clump of wild garlic from the bountiful supply in his garden. He's a dealer you see. If you need to get your hands on any of the green stuff, he's your man. But alas, I failed and my garden is ransom-free. 

I could take myself off foraging. I really could. Although that would probably involve levels of organisation which are a little beyond my abilities during the Easter holidays when my days are filled with giant cardboard structures, never ending stories of monstrous monsters made of slime, my 5 year old's new found love for knock knock jokes, dens, mud, sticks and endless cries of "book, now".

My first stash of the season came courtesy of Tim at Franklins Farmshop. I took it swimming with me. The aroma filling the changing room after half an hour in the pool may have gained me a few strange glances. Then Farmdrop came up trumps with the bounty, along with some other quite simply stunning vegetables and salads.


Farmdrop describes itself as being a bit like an online farmers market. A place where you can get delicious food and meet the local producers behind it. Farmdrop works in a different way to other online shops - rather than harvesting what is available and then selling it, the producers harvest, bake, catch once they have received your order. The result is fresher produce for you and no waste for them. Win win.

So, what to make once you get your mitts on some wild garlic? Well first up, I always replenish my stocks of wild garlic pesto and wild garlic oil (they keep brilliantly in the freezer). I also have my sights set on Fleur Bell's wild garlic & cheese scones which she baked for our last Band of Bakers event, seriously moreish. But what I'm making lots of right now, are these wild garlic socca.

Socca (or farinata) is a protein rich pancake made from chickpea flour. Naturally gluten free and dairy free its a great recipe to have up your sleeve if you are catering for anyone with food allergies or intolerances. Perfect for weaning babies and children as an alternative to bread or crackers, it can be used to dip, scoop or just eat as it is. I make it quite often for my boys (who are now 5 and 1).

In this recipe, the wild garlic gives the socca a gentle background flavour which works so well with the creamy whipped feta. I like to serve this for family lunch with some olives and sun blush tomatoes, but it would work just as well for pre-dinner nibbles or as a starter.

The lovely folk at Farmdrop are offering you £20 off a £40 shop if you would like to try them out for yourselves. All you have to do is place an order for £40 or more before the end of April and use the code REVOLUTIONGINGER at checkout to receive the discount. This offer is valid for one shop only until 30th April 2016.


Ingredients

For the whipped feta:

150g good feta
75g cream cheese
25-50g natural Greek yogurt
freshly squeezed juice of 1/2 lemon
2 tbsp extra virgin olive oil (plus extra to serve)

For the socca:

200g gram flour
1/2 tsp salt (optional)
2 tbsp olive oil
350ml cold water
a large handful of wild garlic, washed and finely sliced
oil for frying (I use groundnut)

Method

Begin by making the batter for the socca. Put the gram flour, salt (if using) and olive oil in a bowl and whisk in the cold water until you have a thin batter with no lumps. Put to one side.

To make the whipped feta, break the feta into chunks, place in a food processor and blitz until broken down. Add the cream cheese, half of the greek yogurt, lemon juice and olive oil and continue to blitz until smooth, adding the rest of the yogurt if the mixture is a little too thick (I find that the consistency of cream cheese and greek yogurt can vary quite a bit depending on the brains you use, so for a firmer whipped feta to use as a dip, you may not need all of the yogurt). Keep the whipped feta covered in the fridge until ready to serve.

When you are ready to make the socca, put a small frying pan over a medium heat. Stir the wild garlic into the socca batter. Put a little oil in the base of the frying pan (I do this by pouring about a tablespoon of oil into the frying pan, swirling it around and then pouring it into a little heatproof bowl. Then before frying each socca, I used a wad of kitchen roll to wipe the remaining oil around the base of the frying pan). Pour a ladle-full of batter into the frying pan and swirl around to cover the bottom, as you do when making a pancake. Fry for 2 minutes on each side, or until golden brown and beginning to crisp at the edges. They are ready to eat straight away, or can be made ahead and then put into the oven (180 C / 160 C fan) for 5 minutes to reheat.

How much batter you will need depends on the size of your frying pan and how thick you would like your socca to be. I like to make them quite thin for this recipe so that my boys can spread them with the whipped feta and roll them up if they want to, but you may prefer a thicker, more robust socca to scoop the whipped feta up with.

Serves 4 as a light lunch or 6 as a starter

After writing up this recipe I opened up my brand new copy of Alice Hart's fantastic book, The New Vegetarian to find a similar recipe for wild garlic chickpea pancakes - great minds and all that…

I received a voucher worth £50 from Farmdrop to test out their online shop. 

Saturday, 26 March 2016

Orange & Marzipan Hot Cross Buns


My overwhelming memory of homemade hot cross buns is of tough, practically inedible, crosses. So  distracting were they, that I have no recollection of the buns themselves. Although I very much doubt that they were of the soft, rich, pillowy variety. More likely, they would have been simple, spiced wholemeal buns with sultanas but no mixed peel (definitely no mixed peel, given my Mum's well documented dislike for it). And so, as I grew up, I found myself drawn to the bakery-bought buns with their doughy crosses, saving myself a small fortune on emergency dentistry. 

Then one day, a local friend left a small package on my doorstep on his way home from work. Four of his freshly baked stem ginger hot cross buns. They were everything a homemade hot cross bun should be: rich, sweet, spiced and packed with fruit. Best of all, the crosses had just the right amount of bite. His tip, for this (then) hot cross bun novice, was to use milk instead of water to make the paste for the crosses. Years, and many buns, later I still prefer milk for my crosses.

I seem to have inherited my Mum's aversion to mixed peel. Unless it's homemade candied orange and lemon peel of course, but with two small boys constantly around my ankles and the near incessant cries of Mummy, Mummy, Mummy, I was not going to find the time to set about making any in time to put it into this year's hot cross buns (there's always next year). I used a mixture of Turkish black sultanas and golden sultanas. The orange flavour in these buns comes through well without the peel, but you could use ready mixed dried fruit or make up your own mixture of sultanas and good quality mixed peel.

I have adapted my recipe this year to adopt Felicity Cloake's method of infusing the milk for the dough with whole spices. It gives the buns a gentle, more subtle, spice. So many shop bought buns have a harshness to them due to over-spicing, which our palates are probably more accustomed to now, so these buns do taste quite different. But do give this method a go, even if just for that gorgeous background flavour of cardamon.


Ingredients

For the buns:

220g dried fruit 
finely grated zest of 2 oranges
3 tbsp cointreau
3 tbsp freshly squeezed orange juice
240ml whole milk 
1 cinnamon stick
3 cardamon pods, bruised
3 cloves
1/4 tsp freshly grated nutmeg
500g strong white bread flour
75g golden caster sugar
10g fast action yeast (I use Dove's Farm Quick Yeast)
1/2 tsp salt
1/2 tsp ground ginger
2 medium eggs, beaten
50g unsalted butter, softened
120g good quality marzipan, diced

For the crosses:

4 tbsp plain flour
3-4 tbsp milk

For the glaze (optional):

2 tbsp caster sugar
2 tbsp water

Method

Start the day before you want to bake your hot cross buns by preparing the dried fruit. Put the dried fruit, orange zest, cointreau and orange juice into a small pan over a low heat. Heat gently, stirring often, until hot. Remove from the heat, cover and leave overnight (or for at least 4 hours) until the fruit has soaked up all, or most, of the liquid.

Put the milk, cinnamon stick, nutmeg, cloves and bruised cardamon into a small pan over a low heat. Bring to the boil, remove from the what and leave to infuse for 1 hour. 

Mix together the flour, caster sugar, salt, ground ginger and yeast in a large bowl (or the bowl of a stand mixer). Strain the milk through a sieve. Add to the milk, butter and eggs to the flour and mix to form a sticky dough. Tip onto a lightly floured work surface and knead for about 10 minutes (or knead with a dough hook in your stand mixer), until you have a smooth, elastic dough.

Put the dough into a lightly greased bowl, cover and leave to prove until it has doubled in size (around 2 hours).

Tip the proved dough onto a lightly greased work surface and knock out the air. Scatter the soaked dried fruit and cubed marzipan onto the dough and knead until evenly incorporated. Divide the dough into 15 equal pieces (you can do this by eye, or alternatively by weight which will give you more even buns). 

Roll each piece of dough into a ball and place in rows on a lightly greased baking sheet. Cover and leave to prove until they have doubled in size. 

Preheat your oven to 210 C.

To make the crosses, mix the plain flour with enough of the milk to make a thick paste. Transfer the paste to a piping bag fitted with a fine nozzle. Pipe crosses onto the buns, or if you don't have a piping bag, use a teaspoon to draw the crosses. Bake the buns for about 20 minutes until golden brown (depending on your oven, they may need up to 5 minutes more).

Whilst the buns are in the oven, make the glaze (if using). Mix the sugar and water in a small pan and heat until the sugar has dissolved but not coloured.

Remove the buns from the oven and brush the tops with the glaze. Transfer to a wire rack to cool.

Makes 15 buns


*When I baked these buns again for our Band of Bakers 'Spring Bakes' event last week I queried whether adding the fruit before the first or the second prove made much difference to the buns, resulting in a bit of a debate. I'm not sure it makes that much difference, but I prefer the texture of the buns using the method in my recipe above. The issue is that both the addition of the spice and the fruit slows down the rate at which the dough proves, but in testing this recipe I haven't found that adding the spices to the milk slows down the first prove significantly. Some recipes opt for a 3 stage prove - proving again once the fruit has been added, but before shaping into balls. Which method do you prefer? 

Thursday, 17 March 2016

Roasted Red Pepper & Tomato Soup with Harissa Oil


The sun came out today. It brightened up my day.

If I ignore the cheeky bitter wind, my winter coat and bright yellow woolly scarf I can almost (almost) imagine that the warm rays on my face are from the evening Andalusian sun. I close my eyes, feel the heat and I'm back in the little garden of our white washed holiday home high up above the Sacramonte. Dusk is falling, heads pleasantly fuzzy from just one too many glasses of sherry. Giant, sweet red peppers are blistering in the embers of the barbecue, destined for lunchtime salads of salty anchovies, sun ripened tomatoes, crisp white onions, vibrant parsley and generous amounts of local olive oil.

Flavours, smells, feelings, colours that map out our year in family meals and holidays. Weeks under the blistering Spanish sun, long Easter weekends with family in France, lazy summer lunches in the little garden of our London home.

And so, with the first glimmers of springtime sunshine streaming through the windows, a little warmth creeping in, I crave the vibrant colours of my last holiday under the bright blue Malaga skies. This, the simplest of soups to make, yet visually stunning, bridges the gap between desire and reality. The essence of my summers in a comforting bowl of warm soup.

A perfect starter for a relaxed Easter Sunday lunch with family and friends, it can be made ahead of time and is great for babies and children too.

Ingredients

For the soup:

3 red bell peppers
1 tbsp olive oil
1 large red onion, finely chopped
2 (400g) tins whole plum tomatoes
1 tsp low Marigold low salt vegetable bouillon (optional)

To serve:

Natural whole milk yogurt
1 tsp harissa (I used Belazu Rose Harissa) mixed with 2 tsp extra virgin olive oil

Method

Begin by preparing the red peppers. The easiest way to do this is on the gas hob (if you have one) - keep the peppers whole, place them over the flame and keep turning the peppers until their skin is black and blistered. Put the whole peppers into a plastic bag and seal (or place in a bowl and cover with cling film). Leave until cool enough to handle and then remove all of the skin, which should peel away easily, core and seeds. (If you don't have a gas hob you can achieve the same result by putting the peppers - sliced in half lengthways - under a hot grill). Roughly chop the peppers and set aside.

Put a heavy based saucepan over a low to medium heat. Add the olive oil and then the chopped red onion. Cook gently, stirring often for 8-10 minutes until the onions are soft, but not coloured.

Add the chopped red peppers, plum tomatoes, vegetable bouillon (if using - I don't use stock or salt when cooking for babies under 12 months) and 400ml boiling water to the saucepan. Bring to a gentle simmer and cook for 5 minutes.

Remove the soup from the heat, transfer to a blender and blitz until smooth. Put the pureed soup back in the saucepan, season to taste with freshly ground black pepper and salt (if using).

To serve, ladle the soup into warm bowls and top each one with a desert spoonful of yogurt and a little harissa oil.